Project RC

一种标准阿西的设计与实现。

Rust FFI 调用时传递 trait object 作为参数的问题

创建于
分类:Dev
标签:RustFFICC++Trait Object虚函数表

最近实验室一个同学在使用 Rust 和 C 互调用时,发现当把 trait object 指针传入一个接受 void * 的 C 函数后,C 再次使用这个指针作为参数调用 Rust 的函数,会发生 segmentation fault,交流和搜索之后找到了原因和解决方案,记录如下。

Foreign Language Interface(FFI)

众所周知,Rust 和 C 可以相互调用对方导出的函数,这种调用接口称为 FFI。

举一个极简的例子,来演示 Rust 和 C 的互调用:

// src/boring.c

#include <stdio.h>

extern void call_rust_with_foo(void *foo);

void call_c_with_foo(void *foo) {
    printf("Hello from C!\n");
    call_rust_with_foo(foo);
}
// src/main.rs

use std::os::raw::c_void;

pub struct Foo {}

impl Foo {
    fn foo(&self) {
        println!("foo!");
    }
}

#[link(name = "boring", kind = "static")]
extern "C" {
    fn call_c_with_foo(foo: *const c_void);
}

#[no_mangle]
pub extern "C" fn call_rust_with_foo(foo: *const Foo) {
    println!("Hello from Rust!");
    let foo = unsafe { &*(foo) };
    foo.foo();
}

fn main() {
    let foo_impl = Foo {};
    let foo = &foo_impl;
    unsafe {
        call_c_with_foo(foo as *const Foo as *const c_void);
    }
}
// build.rs

use cc;

fn main() {
    cc::Build::new().file("src/boring.c").compile("libboring.a");
}

编译运行会输出:

Hello from C!
Hello from Rust!
foo!

出错场景

在上面的例子中,如果因为一些需求,要把 Foo 改成 trait,struct FooImpl 实现 trait Foo,此时试图在 FFI 函数参数中传递 *const dyn Foo,就会出现 segmentation fault。

修改后 src/main.rs 文件如下:

// src/main.rs

use std::os::raw::c_void;

pub trait Foo {
    fn foo(&self);
}

pub struct FooImpl {}

impl Foo for FooImpl {
    fn foo(&self) {
        println!("foo!");
    }
}

#[link(name = "boring", kind = "static")]
extern "C" {
    fn call_c_with_foo(foo: *const c_void);
}

#[no_mangle]
pub extern "C" fn call_rust_with_foo(foo: *const dyn Foo) {
    println!("Hello from Rust!");
    let foo = unsafe { &*(foo) };
    foo.foo();
}

fn main() {
    let foo_impl = FooImpl {};
    let foo = &foo_impl as &dyn Foo;
    unsafe {
        call_c_with_foo(foo as *const dyn Foo as *const c_void);
    }
}

运行输出:

Hello from C!
Hello from Rust!
[1]    68850 segmentation fault  ./target/debug/trait-object-ffi

胖指针和瘦指针

经过一些搜索后明白出错的原因与胖瘦指针有关。Rust 中的 trait object 是胖指针(fat pointer),在 64 位机器上,占据 16 字节,是瘦指针(thin pointer)的两倍,实际也就是由两个瘦指针构成。

通过 std::mem::size_of 可以验证这一点:

fn main() {
    println!("{}", std::mem::size_of::<&FooImpl>()); // 输出 8
    println!("{}", std::mem::size_of::<&dyn Foo>()); // 输出 16
}

为什么会有这个区别呢,是因为当把 &foo_impl 转成 trait object 时,它丢失了原来的具体类型信息,这时候要调用 FooImpl::foo 函数,需要走虚函数表查询函数地址,这个过程叫做 动态分派(dynamic dispatch)。因此,&dyn Foo 的第一个 8 字节指向 FooImpl 对象,第二个 8 字节指向 FooImpl 的虚函数表。

有趣的是,C++ 中实现 dynamic dispatch 时,是把虚函数表指针放在对象的开头(这篇文章 中有过相关讨论),所以 C++ 中不需要胖指针,代价是调用虚函数时需要多一次 dereference。

回到问题,由于 &dyn Foo 乃至 *const dyn Foo 是胖指针,那么转成 *const c_void 传给 call_c_with_foo 的时候就已经丢失了第二个 8 字节的虚函数表指针,由 C 代码再传回 call_rust_with_foo,虚函数表指针就是一个野指针了。

解决方案 1:两层指针

要解决问题,最简单的方案是把胖指针放在一个变量(或者 Box)里,再取这个变量的地址传给 C,也就是通过两层指针来传递。

这种方案不需要修改上面的 C 代码,只需修改 src/main.rs

// src/main.rs
// ...

#[no_mangle]
pub extern "C" fn call_rust_with_foo(foo: *const *const dyn Foo) {
    println!("Hello from Rust!");
    let foo = unsafe { &**(foo) };
    foo.foo();
}

fn main() {
    let foo_impl = FooImpl {};
    let foo = &foo_impl as &dyn Foo;
    let foo_raw = foo as *const dyn Foo;
    unsafe {
        call_c_with_foo(&foo_raw as *const *const dyn Foo as *const c_void);
    }
}

解决方案 2:通过 struct 传胖指针

另一种解决方案是直接把胖指针转成某个 struct,然后按 struct 传给 C。

第一种写法

Rust 标准库中曾经有过一个 unstable 的 struct 叫 std::raw::TraitObject 可以用来实现这个解法,虽然它已经被 deprecated 了(rust-lang/rust#84207rust-lang/rust#86833),我们仍然可以手动定义,类似下面这样:

#[repr(C)]
pub struct TraitObject {
    data: *const c_void,
    vtable: *const c_void,
}

于是对代码修改如下:

// src/boring.c

#include <stdio.h>

struct TraitObject {
    void *data;
    void *vtable;
};

extern void call_rust_with_foo(struct TraitObject foo);

void call_c_with_foo(struct TraitObject foo) {
    printf("Hello from C!\n");
    call_rust_with_foo(foo);
}
// src/main.rs
// ...

#[repr(C)]
pub struct TraitObject {
    data: *const c_void,
    vtable: *const c_void,
}

#[link(name = "boring", kind = "static")]
extern "C" {
    fn call_c_with_foo(foo: TraitObject);
}

#[no_mangle]
pub extern "C" fn call_rust_with_foo(foo: TraitObject) {
    println!("Hello from Rust!");
    let foo: &dyn Foo = unsafe { std::mem::transmute(foo) };
    foo.foo();
}

fn main() {
    let foo_impl = FooImpl {};
    let foo = &foo_impl as &dyn Foo;
    unsafe {
        call_c_with_foo(std::mem::transmute(foo));
    }
}

第二种写法

std::raw::TraitObject deprecated 之后,标准库引入了新的接口(rust-lang/rfcs#2580)来实现类似的功能。于是上面的 Rust 代码也可以写成这样:

// src/main.rs

#![feature(ptr_metadata)]

use std::ptr::{DynMetadata, Pointee};

// ...

#[repr(C)]
pub struct TraitObject<T: ?Sized + Pointee<Metadata = DynMetadata<T>>> {
    data: *const (),
    vtable: DynMetadata<T>,
}

#[link(name = "boring", kind = "static")]
extern "C" {
    fn call_c_with_foo(foo: TraitObject<dyn Foo>);
}

#[no_mangle]
pub extern "C" fn call_rust_with_foo(foo: TraitObject<dyn Foo>) {
    println!("Hello from Rust!");
    let foo: &dyn Foo = unsafe { &*std::ptr::from_raw_parts(foo.data, foo.vtable) };
    foo.foo();
}

fn main() {
    let foo_impl = FooImpl {};
    let foo = &foo_impl as &dyn Foo;
    let foo_raw = foo as *const dyn Foo;
    let (data, vtable) = foo_raw.to_raw_parts();
    unsafe {
        call_c_with_foo(TraitObject { data, vtable });
    }
}

虽然这种写法编译器又会报 DynMetadata<T> 不是“FFI-safe”的警告,但由于 DynMetadata<T> 里面实际就是一个 VTable 的指针(是瘦指针),上面的代码是可以正确工作的。

参考资料

Rust FFI 调用时传递 trait object 作为参数的问题

关于静态博客生成器的一点感想

创建于
分类:Misc
标签:BlogOctopressBlogAVeriPressPurePress

从高中刚开始尝试搭建自己的博客,就是采用了静态博客的思路,即使用 Markdown 编写博文,然后用一个静态博客生成器将 Markdown 转换成 HTML,之后使用静态文件服务器部署。与之相对应的是 WordPress 的思路,即动态运行一个网站后端,在请求到来时从文件或数据库加载博文,生成 HTML 返回。

最开始使用的静态博客生成器是 Octopress,是基于 Jekyll 的,后者是 GitHub Pages 使用的默认静态博客生成器。用 Octopress 搭建博客的过程,也是不断学习许多新玩意的过程,比如 Git、常用的 Shell 命令、自定义域名等。

后来学了 Python,想着用这个语言做点什么有用的东西,于是写了自己的静态博客生成器 BlogA,再到后来的 VeriPress 和最新的 PurePress。这段过程在去年已经在我的 Telegram 频道 Channel RC 发过总结,摘录如下:

折腾静态博客生成器很久了,从刚开始学 Python 时候写的 BlogA,到后来重写的「功能看起来更丰富」的 VeriPress,基本满足了自己对一个博客生成器的需求。可是渐渐地,越来越觉得不太对,写 VeriPress 时试图让它变得可扩展,结果导致做了许多对我的需求没有帮助的抽象,代码变得看似解耦实则混乱,最终完全没有动力维护了。

于是前些时间决定再重来一次,对 VeriPress 做一个充分的精简,只保留自己真正需要的功能,尝试用最少的代码实现完美符合自己需求的博客生成器。经过好几次的忙里偷闲,终于写完了,命名为 PurePress。项目的核心 Python 代码只有两个文件,一个是 __init__.py,330 行,用来实现博客的 preview 功能,包括文章的加载、Flask 的路由等,另一个是 __main__.py,260 行,用来实现命令行工具和 build 功能。

PurePress 的一切都是基于我对静态博客生成器的使用习惯,不多不少,代码里没有一句废话(希望真的如此),实在是让人感到舒适。

经过一年的使用和小修小补,PurePress 仍然保持了初心,目前仅 672 行代码(包括空行和注释),只包含我真正需要的功能,即你在本博客网站及 GitHub 仓库 源码中能看到的功能。我想这些功能应该足够支撑大部分人写博客了。

到了最近,又渐渐感觉先前的博客主题 Light 太过花哨,博客的主要关注点应该是它的内容,而不是外观。于是又重新写了一个 PurePress 主题(参考了 这个博客),叫做 Minimal,采用了极简的样式,以凸显内容为目标,减少主题样式本身的喧兵夺主,最终效果还不错。

目前看来,PurePress 本身的功能和对主题的支持经过了一年多的考验还算不错。打算在之后有空的时候补一下文档,让更多对其有兴趣的人可以方便地用它搭建静态博客。

而自己的这个博客在换用 Minimal 主题之后,也将把重心放在输出更优质更有干货的内容上,而不只是让它看起来好看。

关于静态博客生成器的一点感想

std::function 作为参数的函数重载问题

创建于
分类:Dev
标签:C++std::function函数对象函数重载类型转换

今天写 C++ 遇到一个关于 std::function 的有趣问题,经过一些研究之后搞清楚了原因,记录如下。

问题

为了避免其它代码的干扰,把问题简化描述如下:

using namespace std;

void foo(const function<bool()> &f) {
  cout << "bool\n";
}

void foo(const function<void()> &f) {
  cout << "void\n";

  // 编译报错: 有多个重载函数 "foo" 实例与参数列表匹配
  foo([&]() -> bool { return true; });
}

void foo_user() {
  // 编译报错: 同上
  foo([&]() -> bool { return true; });

  // 不报错
  foo([&]() {});
}

为什么?

在某个 C++ 群里询问之后,有一个群友提醒说可以把编译报错的那个 lambda 表达式手动构造成 std::function<bool()> 来解决,于是修改成下面这样:

using namespace std;

void foo(const function<bool()> &f) {
  cout << "bool\n";
}

void foo(const function<void()> &f) {
  cout << "void\n";

  // 不报错
  foo(std::function<bool()>([&]() -> bool { return true; }));
}

void foo_user() {
  // 不报错
  foo(std::function<bool()>([&]() -> bool { return true; }));

  // 不报错
  foo([&]() {});
}

确实解决了无法找到合适的重载函数的问题。进而意识到,用 lambda 的时候会报错是因为 lambda 到 std::function 有一次类型转换,而 [&]() -> bool { return true; } 可能既可以转换为 std::function<bool()> 也可以转换为 std::function<void()>,从而产生了二义性。

群友后来又发现 std::function<bool()> 可以赋值给 std::function<void()>,于是猜测 std::function 可能不关心它所表示的函数的返回类型,但这仍然无法解释为什么 foo([&]() {}) 不报错。后来因为忙其它事情,群里也没有继续再讨论了。

空闲下来之后,继续研究了这个问题,把前面觉得可能的猜测都找到了定论。

为了方便解释,下面用 Cling 解释器来求值一些 type trait,以观察不同 std::function 实例之间的关系。

首先导入需要的头文件:

$ cling -std=c++17
[cling]$ #include <type_traits>
[cling]$ using namespace std;

然后用 std::is_convertible_v 来检查不同 std::function 之间是否能相互转换:

[cling]$ is_convertible_v<function<bool()>, function<void()>>
(const bool) true
[cling]$ is_convertible_v<function<void()>, function<bool()>>
(const bool) false
[cling]$ is_convertible_v<function<bool(int)>, function<bool()>>
(const bool) false
[cling]$ is_convertible_v<function<bool(int)>, function<void()>>
(const bool) false
[cling]$ is_convertible_v<function<bool(int)>, function<void(int)>>
(const bool) true
[cling]$ is_convertible_v<function<void(int)>, function<bool()>>
(const bool) false
[cling]$ is_convertible_v<function<void(int)>, function<void()>>
(const bool) false
[cling]$ is_convertible_v<function<void(int)>, function<bool(int)>>
(const bool) false

观察上面的结果可以发现,在参数类型相同的情况下,有返回类型的 std::function 可以转换为无返回类型的 std::function,反过来则不可以。

从而一开始的问题便可以解释通了:

  • [&]() -> bool { return true; } 既可以转换为 std::function<bool()> 也可以转换为 std::function<void()>,于是产生二义性;
  • [&]() {} 只能转换为 std::function<void()>,于是没有二义性;
  • 手动构造出的 std::function<bool()> 虽然也可以转换为 std::function<void()>,但由于有一个不需要类型转换的重载,于是也没有二义性。

为什么 std::function<bool()> 可以转换为 std::function<void()>

虽然一开始问题解决了,但是还是不明白为什么 std::function<bool()> 可以转换为 std::function<void()>,于是去找了 std::function 的实现(以 LLVM 的 libcxx 为例,代码相比 GNU libstdc++ 更清晰一些),节选如下:

template<class _Rp, class ..._ArgTypes>
class /* ... */ function<_Rp(_ArgTypes...)> /* : ... */ {
    // ...

    template <class _Fp, bool = _And<
        _IsNotSame<__uncvref_t<_Fp>, function>,
        __invokable<_Fp&, _ArgTypes...>
    >::value>
    struct __callable;

    template <class _Fp>
    struct __callable<_Fp, true> {
        // MARK 1
        static const bool value = is_same<void, _Rp>::value ||
            is_convertible<typename __invoke_of<_Fp&, _ArgTypes...>::type, _Rp>::value;
    };
    template <class _Fp>
    struct __callable<_Fp, false> {
        static const bool value = false;
    };

    template <class _Fp>
    using _EnableIfCallable = typename enable_if<__callable<_Fp>::value>::type;

    // ...

    // MARK 2
    template<class _Fp, class = _EnableIfCallable<_Fp>>
    function(_Fp);

    // ...
};

可以看到 MARK 2 处为满足 _EnableIfCallable<_Fp>_Fp 实现了一个构造函数,而满足 _EnableIfCallable<_Fp> 意味着 __callable<_Fp>::valuetrue。根据 MARK 1 处的偏特化,发现当 _Rp(也就是 std::function 的返回类型)为 void、或调用 _Fp 的返回值类型可以转换为 _Rp 时,__callable<_Fp>::valuetrue

也就是说,除了前面观察发现的结论——有返回类型的 std::function 可以转换为无返回类型的 std::function,标准库还允许有返回类型的 std::function 转换为返回类型可由前者的返回类型构造的 std::function。用上一节的方式验证如下:

[cling]$ is_convertible_v<function<int(int)>, function<long(int)>>
(const bool) true
[cling]$ struct A {};
[cling]$ struct B : A {};
[cling]$ is_convertible_v<function<B(int)>, function<A(int)>>
(const bool) true
[cling]$ is_convertible_v<function<A(int)>, function<B(int)>>
(const bool) false

看到这其实已经豁然开朗了,从逻辑上来说,一个有返回值的函数确实可以当作没有返回值的函数来调用,返回 T 的函数也可以当作返回 T 能转换到的类型的函数来调用,只需进行一次类型转换,非常合理。

为了确定这是 C++ 标准定义的行为而不是标准库实现的私货,去翻了 C++17 标准(因为前面的讨论都是在 C++17 标准上进行的,虽然新版本并没有变化),在 23.14.3 和 23.14.13.2 确实有相关表述,这里就不贴出了。

参考资料

std::function 作为参数的函数重载问题

ARMv8 内存系统学习笔记

创建于
分类:Note
标签:ARMARMv8内存模型内存序Memory OrderingCache

References

Cache coherency

Cacheability

Normal memory 可以设置为 cacheable 或 non-cacheable,可以按 inner 和 outer 分别设置。

Shareability

设置为 non-shareable 则该段内存只给一个特定的核使用,设置为 inner shareable 或 outer shareable 则可以被其它观测者访问(其它核、GPU、DMA 设备),inner 和 outer 的区别是要求 cache coherence 的范围,inner 观测者和 outer 观测者的划分是 implementation defined。
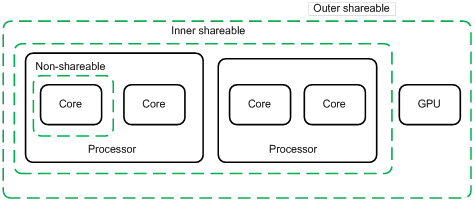
PoC & PoU

当 clean 或 invalidate cache 的时候,可以操作到特定的 cache 级别,具体地,可以到下面两个“点”:

Point of coherency(PoC):保证所有能访问内存的观测者(CPU 核、DSP、DMA 设备)能看到一个内存地址的同一份拷贝的“点”,一般是主存。

Point of unification(PoU):保证一个核的 icache、dcache、MMU(TLB)看到一个内存地址的同一份拷贝的“点”,例如 unified L2 cache 是下图中的核的 PoU,如果没有 L2 cache,则是主存。

当说“invalidate icache to PoU”的时候,是指 invalidate icache,使下次访问时从 L2 cache(PoU)读取。

PoU 的一个应用场景是:运行的时候修改自身代码之后,使用两步来刷新 cache,首先,clean dcache 到 PoU,然后 invalidate icache 到 PoU。

Memory consistency

ARMv8-A 采用弱内存模型,对 normal memory 的读写可能乱序执行,页表里可以配置为 non-reordering(可用于 device memory)。

Normal memory:RAM、Flash、ROM in physical memory,这些内存允许以弱内存序的方式访问,以提高性能。

单核单线程上连续的有依赖的 strldr 不会受到弱内存序的影响,比如:

str x0, [x2]
ldr x1, [x2]

Barriers

ISB

刷新当前 PE 的 pipeline,使该指令之后的指令需要重新从 cache 或内存读取,并且该指令之后的指令保证可以看到该指令之前的 context changing operation,具体地,包括修改 ASID、TLB 维护指令、修改任何系统寄存器。

DMB

保证所指定的 shareability domain 内的其它观测者在观测到 dmb 之后的数据访问之前观测到 dmb 之前的数据访问:

str x0, [x1]
dmb
str x2, [x3] // 如果观测者看到了这行 str,则一定也可以看到第 1 行 str

同时,dmb 还保证其后的所有数据访问指令能看到它之前的 dcache 或 unified cache 维护操作:

dc csw, x5
ldr x0, [x1] // 可能看不到 dcache clean
dmb ish
ldr x2, [x3] // 一定能看到 dcache clean

DSB

保证和 dmb 一样的内存序,但除了访存操作,还保证其它任何后续指令都能看到前面的数据访问的结果。

等待当前 PE 发起的所有 cache、TLB、分支预测维护操作对指定的 shareability domain 可见。

可用于在 sev 指令之前保证数据同步。

一个例子:

str x0, [x1] // update a translation table entry
dsb ishst // ensure write has completed
tlbi vae1is, x2 // invalidate the TLB entry for the entry that changes
dsb ish // ensure that TLB invalidation is complete
isb // synchronize context on this processor

DMB & DSB options

dmbdsb 可以通过 option 指定 barrier 约束的访存操作类型和 shareability domain:

option ordered accesses (before - after) shareability domain
oshld load - load, load - store outer shareable
oshst store - store outer shareable
osh any - any outer shareable
ishld load - load, load - store inner shareable
ishst store - store inner shareable
ish any - any inner shareable
nshld load - load, load - store non-shareable
nshst store - store non-shareable
nsh any - any non-shareable
ld load - load, load - store full system
st store - store full system
sy any - any full system

One-way barriers

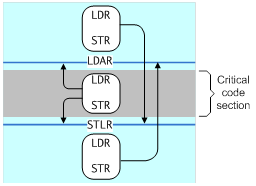
  • Load-Acquire (LDAR): All loads and stores that are after an LDAR in program order, and that match the shareability domain of the target address, must be observed after the LDAR.
  • Store-Release (STLR): All loads and stores preceding an STLR that match the shareability domain of the target address must be observed before the STLR.
  • LDAXR
  • STLXR

Unlike the data barrier instructions, which take a qualifier to control which shareability domains see the effect of the barrier, the LDAR and STLR instructions use the attribute of the address accessed.
C++ & Rust memory order

Relaxed

Relaxed 原子操作只保证原子性,不保证同步语义。

// Thread 1:
r1 = y.load(std::memory_order_relaxed); // A
x.store(r1, std::memory_order_relaxed); // B

// Thread 2:
r2 = x.load(std::memory_order_relaxed); // C
y.store(42, std::memory_order_relaxed); // D

上面代码在 ARM 上编译后使用 strldr 指令,可能被乱序执行,有可能最终产生 r1 == r2 == 42 的结果,即 A 看到了 D,C 看到了 B。

典型的 relaxed ordering 的使用场景是简单地增加一个计数器,例如 std::shared_ptr 中的引用计数,只需要保证原子性,没有 memory order 的要求。

Release-acquire

Rel-acq 原子操作除了保证原子性,还保证使用 release 的 store 和使用 acquire 的 load 之间的同步,acquire 时必可以看到 release 之前的指令,release 时必看不到 acquire 之后的指令。

#include <thread>
#include <atomic>
#include <cassert>
#include <string>

std::atomic<std::string *> ptr;
int data;

void producer() {
    std::string *p = new std::string("Hello");
    data = 42;
    ptr.store(p, std::memory_order_release);
}

void consumer() {
    std::string *p2;
    while (!(p2 = ptr.load(std::memory_order_acquire)))
        ;
    assert(*p2 == "Hello"); // never fires
    assert(data == 42); // never fires
}

int main() {
    std::thread t1(producer);
    std::thread t2(consumer);
    t1.join(); t2.join();
}

上面代码中,一旦 consumer 成功 load 到了 ptr 中的非空 string 指针,则它必可以看到 data = 42 这个写操作。

这段代码在 ARM 上会编译成使用 stlrldar,但其实 C++ 所定义的语义比 stlrldar 实际提供的要弱,C++ 只保证使用了 release 和 acquire 的两个线程间的同步。

典型的 rel-acq ordering 的使用场景是 mutex 或 spinlock,当释放锁的时候,释放之前的临界区的内存访问必须都保证对同时获取锁的观测者可见。

Release-consume

和 rel-acq 相似,但不保证 consume 之后的访存不会在 release 之前完成,只保证 consume 之后对 consume load 操作有依赖的指令不会被提前,也就是说 consume 之后不是临界区,而只是使用 release 之前访存的结果。

Note that currently (2/2015) no known production compilers track dependency chains: consume operations are lifted to acquire operations.

#include <thread>
#include <atomic>
#include <cassert>
#include <string>

std::atomic<std::string *> ptr;
int data;

void producer() {
    std::string *p = new std::string("Hello");
    data = 42;
    ptr.store(p, std::memory_order_release);
}

void consumer() {
    std::string *p2;
    while (!(p2 = ptr.load(std::memory_order_consume)))
        ;
    assert(*p2 == "Hello"); // never fires: *p2 carries dependency from ptr
    assert(data == 42); // may or may not fire: data does not carry dependency from ptr
}

int main() {
    std::thread t1(producer);
    std::thread t2(consumer);
    t1.join(); t2.join();
}

上面代码中,由于 assert(data == 42) 不依赖 consume load 指令,因此有可能在 load 到非空指针之前执行,这时候不保证能看到 release store,也就不保证能看到 data = 42

Sequentially-consistent

Seq-cst ordering 和 rel-acq 保证相似的内存序,一个线程的 seq-cst load 如果看到了另一个线程的 seq-cst store,则必可以看到 store 之前的指令,并且 load 之后的指令不会被 store 之前的指令看到,同时,seq-cst 还保证每个线程看到的所有 seq-cst 指令有一个一致的 total order。

典型的使用场景是多个 producer 多个 consumer 的情况,保证多个 consumer 能看到 producer 操作的一致 total order。

#include <thread>
#include <atomic>
#include <cassert>

std::atomic<bool> x = {false};
std::atomic<bool> y = {false};
std::atomic<int> z = {0};

void write_x() {
    x.store(true, std::memory_order_seq_cst);
}

void write_y() {
    y.store(true, std::memory_order_seq_cst);
}

void read_x_then_y() {
    while (!x.load(std::memory_order_seq_cst))
        ;
    if (y.load(std::memory_order_seq_cst)) {
        ++z;
    }
}

void read_y_then_x() {
    while (!y.load(std::memory_order_seq_cst))
        ;
    if (x.load(std::memory_order_seq_cst)) {
        ++z;
    }
}

int main() {
    std::thread a(write_x);
    std::thread b(write_y);
    std::thread c(read_x_then_y);
    std::thread d(read_y_then_x);
    a.join(); b.join(); c.join(); d.join();
    assert(z.load() != 0); // will never happen
}

上面的代码中,read_x_then_yread_y_then_x 不可能看到相反的 xy 的赋值顺序,所以必至少有一个执行到 ++z

Seq-cst 和其它 ordering 混用时可能出现不符合预期的结果,如下面例子中,对 thread 1 来说,A sequenced before B,但对别的线程来说,它们可能先看到 B,很迟才看到 A,于是 C 可能看到 B,得到 r1 = 1,D 看到 E,得到 r2 = 3,F 看不到 A,得到 r3 = 0

// Thread 1:
x.store(1, std::memory_order_seq_cst); // A
y.store(1, std::memory_order_release); // B

// Thread 2:
r1 = y.fetch_add(1, std::memory_order_seq_cst); // C
r2 = y.load(std::memory_order_relaxed); // D

// Thread 3:
y.store(3, std::memory_order_seq_cst); // E
r3 = x.load(std::memory_order_seq_cst); // F
ARMv8 内存系统学习笔记

使用 Tinc 组建虚拟局域网

创建于 更新于
分类:Ops
标签:TincVPNSDN网络虚拟局域网

以前曾经用过 ZeroTier 给自己多个分布在不同地方的设备组建大内网,后来用不着了,就没再折腾,前段时间又想重新组一下网,于是尝试了一下另一个同类的开源软件 Tinc。本文记录一下使用 Tinc 搭建虚拟网的关键步骤。

安装

Ubuntu/Debian 上直接 apt-get install tinc 安装,其它系统可以网上搜索,基本默认包管理器都可以直接安装。

节点结构

首先想好网络中的节点要如何相连,以三个节点、其中一个有公网 IP 为例,如下图,node2node3 需要主动连接到 node1,从而交换相关元信息,并在 node1 的辅助下建立连接。

目录结构

在每个节点上创建如下目录结构:

/etc/tinc
└── mynet
    ├── hosts
    │   ├── .
    │   └── ..
    ├── .
    ├── ..

这里 mynet 是网络的名字,可以随意。mynet 目录里创建一个 hosts 子目录。

编写配置文件和启动脚本

在三个节点上分别编写配置文件和启动脚本。

node1

/etc/tinc/mynet/tinc.conf

Name = node1
Interface = tinc # ip link 或 ifconfig 中显示的接口名,下同
Mode = switch
Cipher = aes-256-cbc
Digest = sha512

/etc/tinc/mynet/tinc-up(需可执行,以使用 ifconfig 为例):

#!/bin/sh
ifconfig $INTERFACE 172.30.0.1 netmask 255.255.255.0 # IP 根据需要设置,下同

/etc/tinc/mynet/tinc-down(需可执行,以使用 ifconfig 为例):

#!/bin/sh
ifconfig $INTERFACE down

node2

/etc/tinc/mynet/tinc.conf

Name = node2
Interface = tinc
Mode = switch
ConnectTo = node1
Cipher = aes-256-cbc
Digest = sha512

/etc/tinc/mynet/tinc-up(需可执行,以使用 iproute 为例):

#!/bin/sh
ip link set $INTERFACE up
ip addr add 172.30.0.2/24 dev $INTERFACE

/etc/tinc/mynet/tinc-down(需可执行,以使用 iproute 为例):

#!/bin/sh
ip link set $INTERFACE down

node3

基本和 node2 相同,除了 Name = node3 以及 IP 不同。

生成 RSA 密钥对

在每个节点上执行下面命令来生成节点的公私钥:

tincd -n mynet -K 4096

私钥默认保存在 /etc/tinc/mynet/rsa_key.priv,公钥在 /etc/tinc/mynet/hosts/<node-name>,这里 <node-name> 在每个节点上分别是 node1node2node3(Tinc 能够从 tinc.conf 中知道当前节点名)。

交换密钥

node2node3/etc/tinc/mynet/hosts/node2/etc/tinc/mynet/hosts/node3 拷贝到 node1 上的 /etc/tinc/mynet/hosts 中,此时 node1 目录结构如下:

/etc/tinc
└── mynet
    ├── hosts
    │   ├── node1
    │   ├── node2
    │   └── node3
    ├── rsa_key.priv
    ├── tinc.conf
    ├── tinc-down
    └── tinc-up

node1/etc/tinc/mynet/hosts/node1 拷贝到 node2node3,并在该文件开头加上一行:

Address = 1.2.3.4 # node1 的公网 IP

-----BEGIN RSA PUBLIC KEY-----
...
-----END RSA PUBLIC KEY-----

此时 node2 的目录结构如下:

/etc/tinc
└── mynet
    ├── hosts
    │   ├── node1 # 包含 node1 的 Address
    │   ├── node2
    ├── rsa_key.priv
    ├── tinc.conf
    ├── tinc-down
    └── tinc-up

node3node2 类似。

启动 Tinc

在每个节点上分别使用下面命令测试运行:

tincd -D -n mynet

该命令会在前台运行 Tinc,之后即可使用配置文件中配置的 IP 互相访问。

测试成功后可以杀掉刚刚运行的 tincd 进程,改用 systemctl 运行并开机自启动:

systemctl start tinc@mynet
systemctl enable tinc@mynet

参考资料

使用 Tinc 组建虚拟局域网